

After you register, you will see the Projects screen:

Go to the next section to learn how to start a new project.
2. How to start a new project and a source list
1. On the Projects screen, click New project.

2. On the Create a New Project screen that pops up, enter a name for your project and select the appropriate citation style and level. Click Submit. NOTE: Once you create a project, you will be able to switch seamlessly between styles and levels. So what you set up now can be changed later with one click.

3. The Dashboard screen appears. The Dashboard organizes your work environment for effective research. You can see assignments, create to-do lists, submit work, and act on feedback from teachers in an organized way, and all in one place.

4. To begin citing sources, click Sources in the navigation bar at the top.

5. On the Sources screen, click Create new citation and select the best match for your source from the choices given.


7. Click Continue to go to the next screen.

1. On your project's Dashboard screen, under Sharing, click Share with a project inbox.
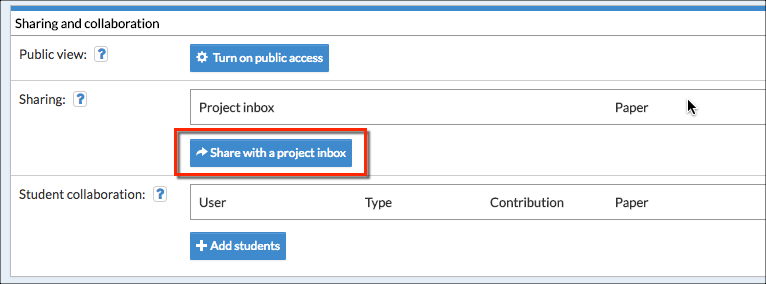
2. In the Project inbox field, enter the name of the inbox (as provided by your teacher). When the first letter of the inbox’s name is entered, a drop-down menu will appear and the name of the drop box can be selected.

5. Click Done.
6. On the Dashboard screen you will now see the inbox’s name under Project inbox.

1. On the project's Dashboard screen, under Student Collaboration, click Add students.


1. See a quick tutorial on how to export your source list to Google Docs or Word Online
2. Formatting your source list
Before you print/export your source list and open it in your word processor or Google Docs, NoodleTools allows you to do some basic formatting. To see the formatting options, clickPrint/Export at the top of your source list and select Formatting Options…

Keep in mind that formatting options affect only the list that is open. Other projects in your personal folder will not change. The formatting options are:
See below for more information on how to use these options.
A “header” is information that appears at the top of each page of your paper. The MLA Handbook indicates that the header at the top of your source list should consist of your last name followed by a space and the page number. The APA Publication Manual states that the header should consist of a shortened version (50 characters or fewer) of the title of your paper (all capital letters, flush left), and the page number (flush right, continued from the body of the paper). If you are not writing a paper that will be published, a header is generally not required (you can ask your teacher if you aren’t sure). NoodleTools can add the header to your source list for you, correctly formatted (although you will still need to make sure that it also appears throughout your essay).
Click Print/Export.
Under Formatting Options, click None
If you are creating an MLA style list, enter your last name and click Set Header.
If you are creating an APA style list, enter a shortened version of your paper’s title and clickSet Header.
The MLA Handbook recommends that an annotation immediately follow the source reference, without any separation (see example in section 5.3.1 of the MLA Handbook). By default, NoodleTools displays annotations in this manner. However, your teacher may instruct you to separate annotations with an extra vertical space, for readability.
Click Print/Export.
Under Formatting Options, click Annotation follows citation on the same line.
Click “Start annotations on a new line.”
All annotations in your source list will be automatically updated.
If you have included annotations in your source list but you do not wish them to appear in the version you print or export, you can omit them:
Click Print/Export.
Under Formatting Options, click Citations and annotations.
Click Print citations only (omit the annotations).
Note that your annotations will no longer appear in your source list, even though you can still edit existing or add new annotations.
Other formatting
To change other document formatting, such as fonts and line spacing, wait until your source list is complete and then make the changes after you have opened your source list in a word processing program or Google Docs.
1. Click Print/Export and choose to Word (which generates a .docx file) or as RTF. While Microsoft Word is often used, .rtf files can be opened in any word processor that supports that file format standard (nearly all word processors do).
2. When you choose to export to a .rtf or .docx file, there are a few possible workflows:
1. If your computer is configured to open Word or another word processing program automatically, your source list may immediately download and open within that word processor. This may or may not be the word processor that you have used to write the rest of your research paper. Regardless, to save the source list, use that word processor’s File > Save as… mechanism to save the document as you wish (for example, in Word, as a .docx file), to a location on your computer or network that you will remember.
2. If your browser is configured to prompt you before opening the file, a browser pop-up window will appear asking you whether you would like to save or open the file. Save the file to a location on your computer or network that you will remember.
3. A security message may notify you that the browser has blocked the site from downloading the file. Click the message and allow the download, then follow options 1 or 2 above.
Open the exported list and copy and paste it at the end of your research paper. It is customary to begin your source list on a new page, not on the last page of your research paper.
NOTE: Do not re-save a .rtf file as a .rtf file after opening it in Word. Doing so can cause formatting issues due to the way Word handles certain RTF codes. Instead, save as .docx.
See video at top of this page for a demonstration.
To export your source list to Google Drive or Word Online:
Click Print/Export.
Click Print/Export to Google Docs or Print/Export to Word Online. Note that only one of those options will be visible to you, depending on how you authenticate into NoodleTools (i.e. users entering NoodleTools via Office 365 will see the Word Online option).
You may be prompted to select your Google or Office 365 account and/or grant access to allow NoodleTools to write a new document. Once complete, your source list will appear in a new Google Doc or Word Online document.
Now that the file has been saved in a Google Doc or Word Online, open it and copy and paste the source list to the end of your research paper. It is customary to begin your source list on a new page, not on the last page of your research paper.
NoodleTools allows you to preview your formatted source list as an HTML-based webpage:
Click Print/Export.
Click Preview as Web Page (HTML).
A new window will open containing just your source list. If no window appears, disable your popup blocker and retry.
The final version of your source list should always be printed after it is exported and viewed in your word processor or Google Docs. Do not print your source list from the Preview version because that webpage represents only a close approximation of the correct spacing and formatting.
7. Troubleshooting
Print/Export does not work.
Make sure your browser's pop-up blocker is turned off for NoodleTools.